A few years back I decided it would be cheaper for me to build myself a couch then to buy another, me and the cats are kind of hard on furniture. The manufactured couches are designed to fall apart, that is what keeps our economy working…And It became time for me to consider a new couch, wondered if I could BUILD one.
I began to do research on just what was involved with making such a thing. I have little experience with upholstering and really wasn’t ready to pursue LEARNING how to do it. It occurred to me to make a couch that could double as a bed. I do occasionally have guests show up, and it’d be nice to have an actual bed for them use, rather then throw a Futon on the floor. I then came across futon couches. A wooden frame that allows the frame to drop into a completely flat format was something I could do. I found a few that I liked but the layout of the action to make it turn from a couch into a bed was a bit daunting. I continued to search. I came across a design online that I actually could easily pursue and required no funky fishhook or check mark shaped paths for the frame to float in. I studied the couch at length.
It telescoped… Simple, to the point, easily built…Yeah this would work. HOWEVER there were other issues I needed to confront.
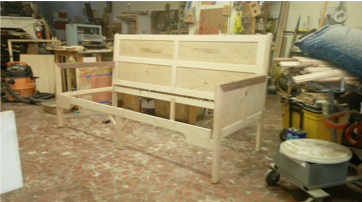
You see, the room I normally put the couch in is small and it’s difficult to manipulate something large like a couch in to the room. In the past I could only get a couch in there by standing it on its side, and walk it on on that side. This action only taken AFTER I emptied the room of everything else in it. Trust me, it was an all day affair getting the OLD couch out to dispose of it, and then, getting the new one in. No, I needed a different answer to the problem. It occurred to me that making a couch that could easily be assembled and disassembled would be much preferable. SO, I sat down and designed a couch that comes apart and goes back together in pieces. The answer to the problem was locking dovetails. Dovetails are basically a mortice and tenon or Lap joint where the Mortise and Tenon are both triangles. There is more then a few ways to do this, however the easiest to do would only give me holding power one way, as its an open lap like joint. One resolves this by using friction and adhesive. The friction works cause as a rule you only put it together once, wood will compress and loosen up with time and sheer. And the idea of using an adhesive wouldn’t work if I was planning taking it apart and putting it together multiple times. Nope…but what if I were to lock it in with a screw? I did some tests, a few drawings and decided to pursue that end. The wood I chose was Ash, cheap, stiff, clean, easy to work with. Maybe some walnut as an accent.
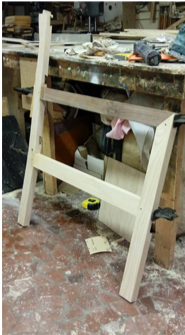
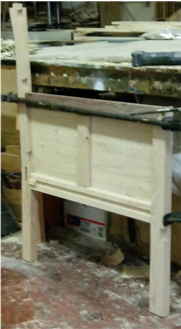
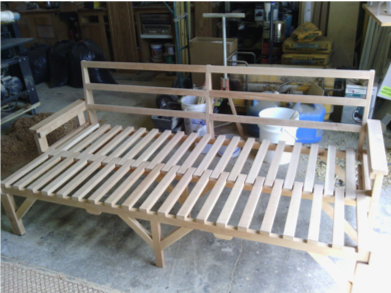
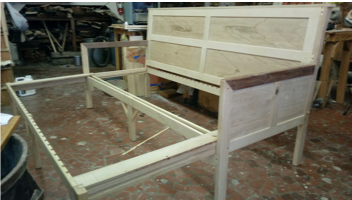
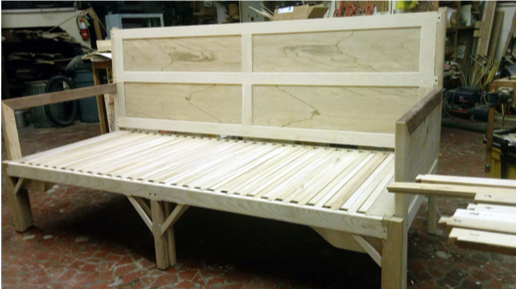
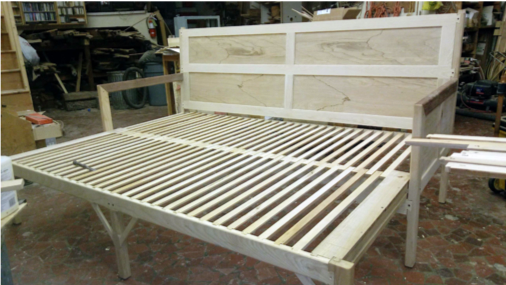
I started by making the frames (sides/profiles of the seat) as permanent structures, employing mortice and tenon, an adhesive and lock it all together with a dowel. And I would only need a panel on One side to make sure the pillow didn’t slide out from under the sleeper to hit the floor, but the other end should be open so that particular friends of mine who might come to visit, and are very tall, would have a place to put their feet.. Then there would be the back. The simplest way to deal with that would be a large paneled structure that would dovetail into the frames. But I couldn’t use just the back to separate the two sides, and then there was the aspect of it sliding apart. It would require two separate frames that were independent of each other but fit together like the pieces of a telescope. And the smaller of the two would have to be kept square and keep the front legs from twisting, this “brace” should also act as part of the slats. I chose a double dovetail that would be attached to the sliding mechanism and the front leg and front rail, thus keeping the entire corner square on each side. This would act as a form of brace and would keep the entire sliding mechanism square to the front and back, not turning the frame into a parallelogram and be able to collapse. Then there was the slats. I decided that to have them dovetail on one end and have them loose at the other would work best. I did the math and came up with a 1 ?” and it might be best if they overlapped on each other sorta like a leaf spring….I came up with 1 7/8” for the slats. I cut them to the two lengths I’d need and then proceeded to cut dove tails. I made various jigs for cutting them equal distance apart, and others to make the various size dovetails I’d need I believe there is over 80 dovetail joints total.
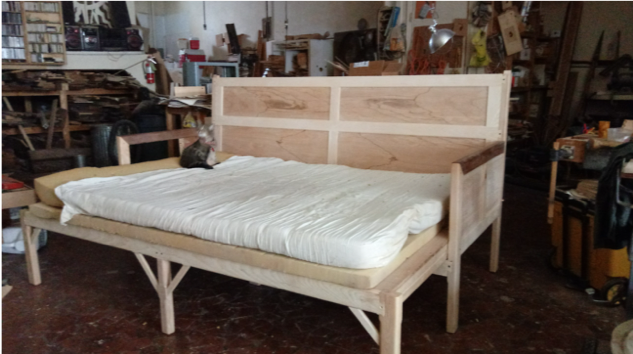
Then there was the test fitting: the final stage was to check to see of the queen sized futon fit. Kiki tested it and gave it her endorsement. Sanded put a polyurethane on it, took it apart and reassembled it in the living room.
Custom is our specialty so if you have a project you’d like to explore, Reach Out. Brainstorming is always a good idea whether we do a project together or not. Don’t you agree?